
How to authenticate your custom domain
Emailing from a non-authenticated domain may impact email deliverability to patients who use email providers such as Google or Yahoo.
Going through this process explicitly authorises Semble to send emails on your behalf. Emailing from an authorised email domain is now a requirement from major email providers such as Google and Yahoo starting from 1st February 2024.
In this article :
Set Up Custom DKIM for Your Domain
Paste The Records in Your Domain Host
Why Authenticate Your Domain
Authenticating your domain significantly helps improve email deliverability and protects your reputation by showing that your emails are legitimate.
However, it is not a foolproof solution. Other factors such as recipient server settings also affect deliverability.
While domain authentication is highly recommended, it does not guarantee that all emails will reach the recipient's main inbox.
What is Domain Authentication?
Domain authentication is the process of verifying that emails sent from your domain (e.g. testclinic.com) are genuinely coming from you. This is done through standard protocols like SPF, DKIM, and DMARC, which help prevent your emails from being marked as spam or rejected by recipient mail servers.
Why Is It Only for Custom Domains?
Domain authentication is only available for users who send emails from a custom domain. This is because the authentication process involves modifying DNS settings—something that can only be done by the owner or administrator of the domain.
If you're using a general email address (like @gmail.com, @yahoo.com, or similar), you won't have access to the DNS settings required to authenticate your domain. For this reason, domain authentication cannot be set up unless you're sending emails from a custom domain.
What Is a Custom Domain?
A custom domain is a domain name that you or your organisation owns and manages. For example:
-
✅ custom domain: admin@testclinic.com
-
❌ non-custom domain: yourclinic@gmail.com, yourclinic@yahoo.co.uk
If you're not sure whether you're using a custom domain, a good rule of thumb is: if your email ends in @gmail.com, @hotmail.com, or any other free email provider, it is not a custom domain.
Generate DNS Records
Please watch the below video on how to complete this process. Or feel free to follow the step-by-step guide underneath:
1. Go to the General settings tab
2. Scroll down to Domain authentication and input your custom domain in the 'Domain you send from' section and click 'Add'

Note: Your domain is usually the second part of the email address.
For example, for jane.doe@semblehealth.help - "semblehealth.help" is the domain.
3. Once you have entered your domain, you will be provided with DNS records that will need to be added to your DNS host. You can copy each record by clicking 'Copy'
Note: Your DNS host is external to Semble. You or whoever helped build your website should have access to this (eg. Squarespace, Wordpress, Godaddy,..).

4. Go to your DNS host account paste the records in your domain host.
If you have any trouble with this process and need assistance, please reach out to support@semble.io.
Set Up Custom DKIM for Your Domain
By default, Semble uses S1 and S2 as DKIM selectors to generate DNS records. However, some practices may already use S1 and S2 for another provider or setup. In these cases, you’ll need to set up custom DKIM selectors to avoid conflicts and maintain proper authentication.
Note: If you do not need to set up a custom DKIM, kindly go to the next step.
Here’s how to set up custom DKIM selectors for your domain:
1. Go to the domain setup area in your account and enter the domain you would like to authenticate.

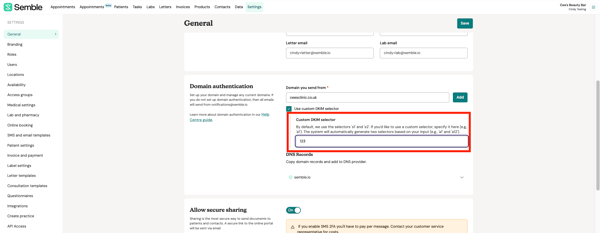
2. Tick the box for “Use custom DKIM selector”. This will allow you to choose a different selector than the default S1 and S2.

3. In the field provided, enter the selector you would like to use (for example: S3 or 123).
The custom selector can be anything you'd like, we recommend to keep it short and simple.
4. Click “Add” once you’ve added your custom selector

The system will then generate new DKIM records based on the custom name you selected.

You can now copy these records and paste the records in your domain host.
Paste The Records in Your Domain Host
The process of copying DNS records will depend on your domain host. We recommend seeking assistance from your IT department or website administrator to ensure the correct setup.
Below, you can find links to the help centres for some of the most commonly used domain hosting providers.
Note: If your host is not listed, please consult their support documentation or contact their support team for assistance.
Verify DNS Records on Semble
After you have pasted the DNS records into your domain host's settings, you will need to verify them within Semble to ensure everything is correctly set up.
Follow the steps below to verify your DNS records on Semble:
1. Go to Your General Settings
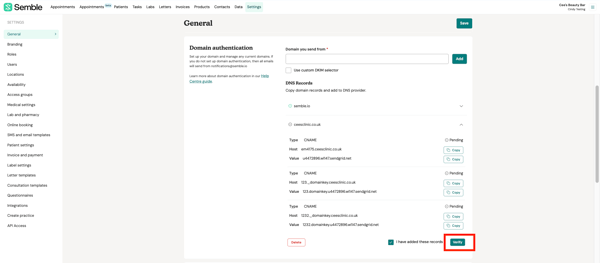
2. Select Your Domain: In the 'Domains' section, find the domain you have added the DNS records for.
3. Tick the 'I have added these records' Box: This indicates that you have pasted the necessary DNS records into your domain host.

4. Click on Verify: Click the "Verify" button to confirm that your records have been successfully added.
Once verified, Semble will check the DNS records, and you'll receive confirmation that everything is set up properly.
If the records are added correctly:
First, you will see a 'Domain verified' notification displayed at the top right-hand corner of your screen.
Second, you will see 'Success' displayed beside each of the records that have been added correctly. As shown in the screenshot below.

If the records are not added correctly:
You will see 'Failed' displayed beside any of the records that were not added successfully, along with an error message with additional detail. These error messages should outline next-steps to rectify the issue caused.

Note: If you complete the process, clicked Verify and get an error message, it may be due to the records still being propagated by your DNS provider, depending on your host it can take up to 48 hours.