Roles determine which users in your practice have permission to view and edit settings in Semble. Every Semble user has a role assigned to them, and different pages, tabs, and settings appear in your Semble depending on the role assigned to you.
In this article:
How to assign a role to a user
Edit Custom Roles
Difference Between Roles and Access Groups
Linked articles:
About System roles
To view your practice's roles, go to the Settings page, and then the Roles tab.
Every practice in Semble automatically has three default System roles set up for them.
System roles cannot be edited, if you would like to edit a role you will need to create a custom role.
-
Manager: Users with every editing permission enabled. Managers are the main admins for your Semble account.
-
Practitioner: Clinicians and medical professionals who see patients and manage patient healthcare
-
Medical Assistant: Medical professionals who assist clinicians and help manage your practice

How to assign a role to a user
You can assign any role to any user:
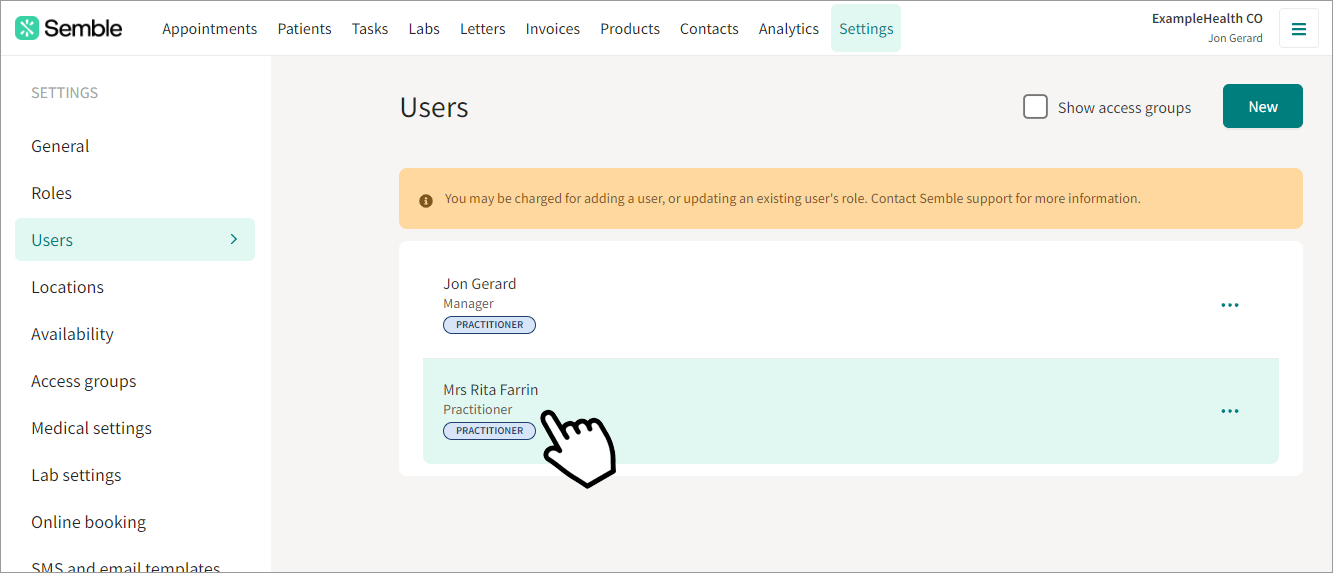
1. Go to Settings, then the Users tab.
2. Select the user who you want to assign a role to.

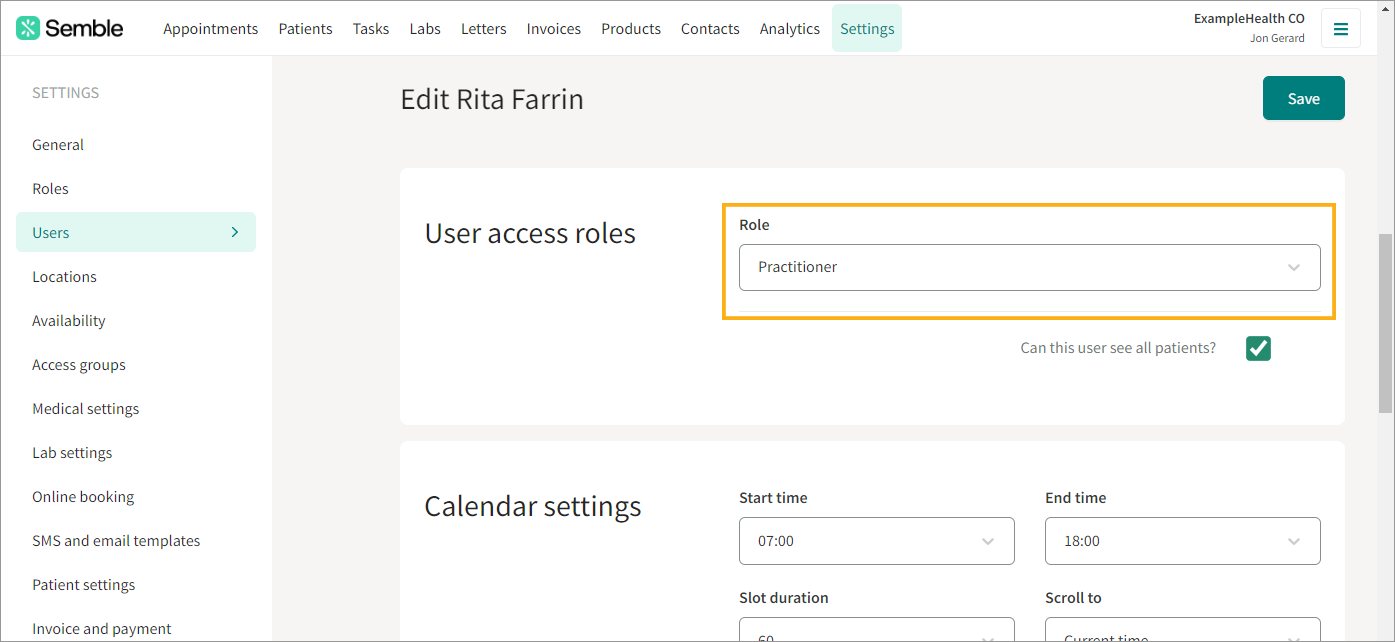
3. Scroll down to User access roles.
4. Select the role you want to give the give the user from the Role dropdown menu.

5. Choose whether you want this user to be able to view all patients in your practice.

6. Click Save.
You can change a user's role at any time by following the same steps as above and selecting a different role from the Role dropdown menu.
Create a Custom Role
Managers, and users who have been given role editing permissions, can create roles for your clinic. Created roles can have a fully customised set of editing permissions.
1. Go to Settings, then the Roles tab.
2. Click New in the top right-hand corner.
3. Give the new role a name.
4. Open the different dropdown menus and tick the permissions that you want to give to the role. You can select Allow all to automatically tick all the permissions in a section.
5. Click Save in the top right-hand corner of the page.
The custom role appears in the Roles tab.
Edit a Custom Role
You can edit the permissions of a custom role at any time:
1. Go to Settings, then the Roles tab.
2. Select the role you want to edit.
3. Make the edits you want. You can rename the role, or open the dropdown menus and tick and untick the permissions you want for the role.
4. Click Save when you have finished editing.
5. Go to Users, access the user for whom you wish to apply this role to and scroll down to the below section to apply this new custom role to them:
Difference Between Roles and Access Groups in Semble
Roles and Access Groups in Semble serve different purposes, but they can sometimes be confused. Here’s a clear breakdown of how they differ:
Roles – What You Can Do in Semble
- Roles define user permissions for navigating and modifying settings within Semble.
- They determine which pages, tabs, and settings a user can view and edit.
- Every Semble user is assigned a role, which affects what they can do on the platform.
- Example: An "Admin" role may have full access to settings and user management, while a "Clinician" role may only have access to patient records and consultations.
Access Groups – Which Patient's Data You Can See
- Access Groups control visibility of patient records and other sensitive information.
- They restrict or allow access to patient data based on predefined group settings.
- Unlike Roles, Access Groups do not change what a user can do in Semble—only which patient records they can access.
- Example: A practice may create an Access Group for "Cardiology" so that only cardiologists and relevant staff can see cardiology patients’ records.
Key Difference
- Roles manage system permissions and determine what actions a user can take.
- Access Groups manage patient visibility and determine which patient records a user can see.
This distinction is important because a user might have a Manager role with full system permissions but still be unable to view certain patient records if they are not in the right Access Group. More information on Access Groups here.


