
With Semble, you can set up a direct link for submission of lab tests, and the receiving of results.
Note: To edit your clinic's lab settings, you must have a role assigned to you that gives you editing permissions for Lab Settings.
In this article:
Linked Articles:
Add lab account
You can add an account that your clinic has with an external laboratory, from the Settings page:
1. Go to the Lab settings and pharmacy settings tab.
2. Click Add lab account.

3. Enter the following details:
- Provider: Click on the arrow to select the external laboratory that you want to link with.
We currently integrate with TDL, LML, Nationwide, OneWelbeck, HCA UK Laboratories, Phoenix, Randox, Viva Health Laboratories and Inuvi.
-
Account Name: The name you want to give this account in Semble
-
ID source code to connect your account: Your ID code associated with the provider.
Note: Please contact your provider if you are unsure of your ID Source Code.

Note: If you are an internal HCA consultant, you will not be able to select HCA UK Labs as a provider.
4. Click Save.
Your external account is now linked with your Semble clinic. You can now order lab tests and receive lab results from the external laboratory.
Upload a Lab Product List
You can upload the published price list of external laboratories to your Semble database, with your choice of markup, from the Settings page.
Note: This will override any previous prices that you set for products already in your Semble system. This will not duplicate products.
This will not affect any custom lab profiles (products not on the standard catalogue). If you have added custom comments to your labs it will also be updated.
1. Go to the Lab and pharmacy settings tab.
2. Scroll down to the Connected labs section and click on the 3 dots next to your lab account:

3. Click 'Upload products list'.
Some labs do not require a product list upload.
4. If you would like to add a markup click 'Yes' for "Do you want to overwrite your prices with the prices in the new list". If you would not like to add a markup click 'No'

5. (Optional) Now you can type in the box 'Markup' and then click 'Save'

Semble uploads the list to your clinic's database. The lab tests will appear as individual products in the Products page. This will start immediately but can take up to an hour to complete.
Note: The above process is the same in order to update your product list.
Delete a Lab Product List
To remove any uploaded lab list you have added into Semble follow the steps below:
1. Click on the three dots next to the connected accounts and select 'Delete product list'.

2. You can then choose to delete all TDL products (including any bespoke products that have been added to Semble manually) or only the products you have previously manually added.

Please note this action cannot be undone.
Create a Lab Request
You can request a lab test for a patient from the Patients page.
Currently, Semble does not support the ability to link multiple tests under a single blood panel. As a result, you will need to order each individual test separately, rather than ordering the entire panel in one go.
1. Create a new consultation note for the patient who you want to order labs for.
2. Click the Product tag in the consultation note creation window.

3. Enter the name of the lab test.
Note: If you would like to order TDL Tinies products, click here.
4. Fill out the rest of the product details. These will be different depending on which lab test you selected.
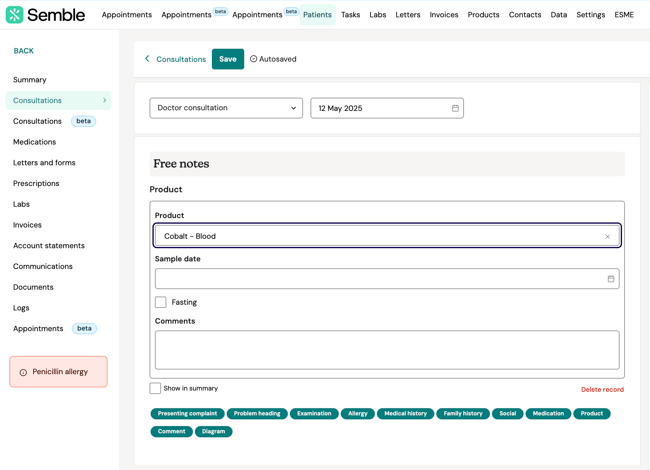
5. Complete the rest of the consultation note as required.
Note: If neither patient or the clinician fills out the sample date in the lab request form, the laboratory will fill it in based on their internal policy.
The sample date entered in the consultation (if any) will be overwritten by the value defined and sent by the laboratory according to their internal policy.
6. Click Save at the bottom of the screen.
7. Click Order labs under the consultation note that you have just created.

The lab test request is automatically sent to the external laboratory. The lab appears in the patient's Labs tab.
Lab status
Below is a breakdown of the different statuses a lab order can have and what each status represents:
- AWAITING RESULTS – The lab order has been created, and results are pending.
- RECEIVED – A lab results file has been uploaded, updating the status accordingly.
- READ – The user has viewed the lab document, marking it as read.
- PROCESSED – The user has shared the lab results, updating the status to indicate completion.
- RECEIVED – If another lab results file is uploaded with the same order number, the status reverts to RECEIVED to reflect the new data.
- READ – When the user views the updated lab results, the status changes back to READ.
When a lab test result has been sent back to your clinic, you can manually change its status to Processed or Unread from the Labs tab:
1. Select a patient you want to view the lab result for. You can see the full details of the lab test.

2. Click the more options icon in the top right-hand corner.

3. Select Mark as processed or Mark as Unread.
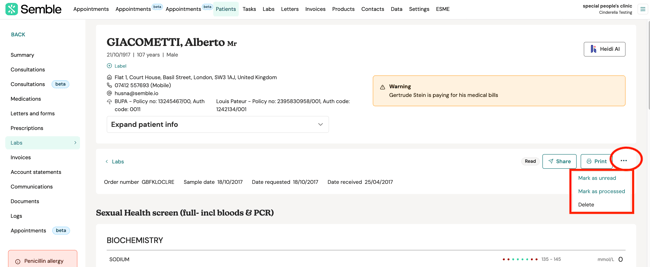
The lab test status changes
Note: Once a lab result has been shared you cannot change its status anymore.
Print a Lab Test Result
You can print a lab test result at any time from the Labs page:
1. Select the patient who you want to print lab results for.

2. Click the print icon in the patient summary.

The lab results open in a new tab as a PDF.
3. Print the PDF as you normally would.
Note that results received from labs that are 0.00 will be shown as 0. All other non 0 values are recorded and captured accurately.
Create a Lab as a Product
This section is about how you can create your own lab procedures as bookable products or if you have bespoke tests from one of our integrated labs for your practice.
You can create a lab procedure at any time from the Products page:
1. Click New.

2. Open the Type dropdown menu and select Lab.
NOTE: To ensure lab requests are processed correctly, always select "Lab" as the "Type" when setting up a test. Selecting any other "Type" may prevent the lab request from being sent.

3. Fill in the compulsory details of the lab.
- Name
- Price: How much your practice will charge patients for the product
- Supplier: Choose the supplier from the dropdown menu

4. Fill in the other details of the lab, some field are optional. If you are integrated with a Lab please ensure Product Code and Supplier has been inputted
-
Product code: Give the lab a unique product code. You may want to check with the lab what the product code is.
-
Serial number: Enter the serial number of the product
-
Stock level: Enter how many of the lab tests you have available
-
Tax: Choose a tax rate from the dropdown menu
-
Cost: Enter how much the lab test costs your practice to supply
-
Comments: Type any comments about the lab test into the box

7. (Optional) Choose the Confirmation and Reminders that you want linked to the lab. For more information, see here.
8. (Optional) Click Add contract pricing to set up alternate pricing with insurers. For more information, see here.
9. Click Save.
The lab procedure appears on the Products page and can now be requested as a lab
Print a Lab Request Form
When you have issued a lab request for a patient, you can print a form or label for it any time from the Patients page:
1. Select the patient who you issued the lab request for.

2. Go to the Labs tab.
3. Select the lab request that you want to print.

4. Select how you would like the lab request to be printed.
Note: All labels are currently printed 7.061cm x 3.351cm.

Whichever you pick, a PDF opens in a new tab in your browser.
5. Choose whether you want to download or print the PDF:

6. Finish downloading or printing as you normally would.